What is Self Assessment, How To Use It?
Virtual reality has become an integral part of life, with more and more businesses preferring to function via online means.
Keeping up with the latest business trends, Growth99+ has introduced a symptom simulator tool called 'Self Assessment' which is a double benefit option. It helps the clinic generate new leads along with providing a better user experience for the website visitors who have no clarity on the services offered by the clinic.
Patients simply need to click on the Self Assessment option available on the website, click on the body areas, and select the symptoms that apply to them, on successful submission of the form, they will get an auto-generated email to inform them of all the services that apply to their symptoms.
Let us see how to configure the Self Assessment in a few simple steps.
STEP 1
Use your login credentials to access your business account to get started. Ensure that all the services that the business offers are added under the "Services" list. To check the steps of adding a service CLICK HERE.
For the purpose of this article, we will add two services "Botox" and "Laser Hair Removal" to the Growth99+ account. The below image presents the information added for the Botox service.

Note: For Self Assessment, the service name, the service page URL from the website, and the description of the service are important. These details are copied in the auto-generated email sent to the new lead. (An email copy is shown at the end)
The services "Laser Hair Removal" and "Botox" are added to the services list in the account.
STEP 2
Now to add symptoms/concerns for the above services, click on the "Self Assessment" menu as shown below.
STEP 3
Choose a title of your choice for your Self Assessment, by clicking on the "pencil icon" that the below image highlights. Here we have used the title "Virtual Self Assessment" as an example. Refer to the second image displayed below, which is also the layout page of the website. The title that you select for your Self-assessment also appears on the website page.
STEP 4
You will see some instructions below the title, this is for the leads who will use the Self Assessment feature on the website. Although we don't recommend any changes, if you intend to edit the instructions, A "pencil icon" (circled in the below image) allows you to make any required changes.
STEP 5
To add the symptoms, we need to add each symptom manually to both the male and female models separately. But first, let us select the models of your choice to proceed with.
There are a pair of models selected by default for your account, to change it to one of your choices, click on "Female" under the change character field, below will be multiple female models available; select the model of your choice. Follow the same steps to select the Male model.
Refer to the below image for more precise instructions.
For male models, choose as shown below.
STEP 6
The next step involves adding the symptoms and selecting the corresponding services, by clicking on relevant body parts of the selected model. As an example, we will add the symptoms "Wrinkles and Lines" to the face of the model.
To add the service "Botox" to the female model, click on the female model and then select the body part "head".
In the first input field, type the symptom (Wrinkles in this case), and click on the "Service" field to select the applicable services from the list.
Once added, click on the icon "+", which the above image highlights, to add the symptom successfully.
STEP 7
Similarly, we select the body part "Hands" and add the symptom "Hair Removal" for the service "Laser Hair Removal".
Note: To edit the symptom or add/remove a service, click on the pencil icon as shown in the below image and make the required changes.
STEP 8
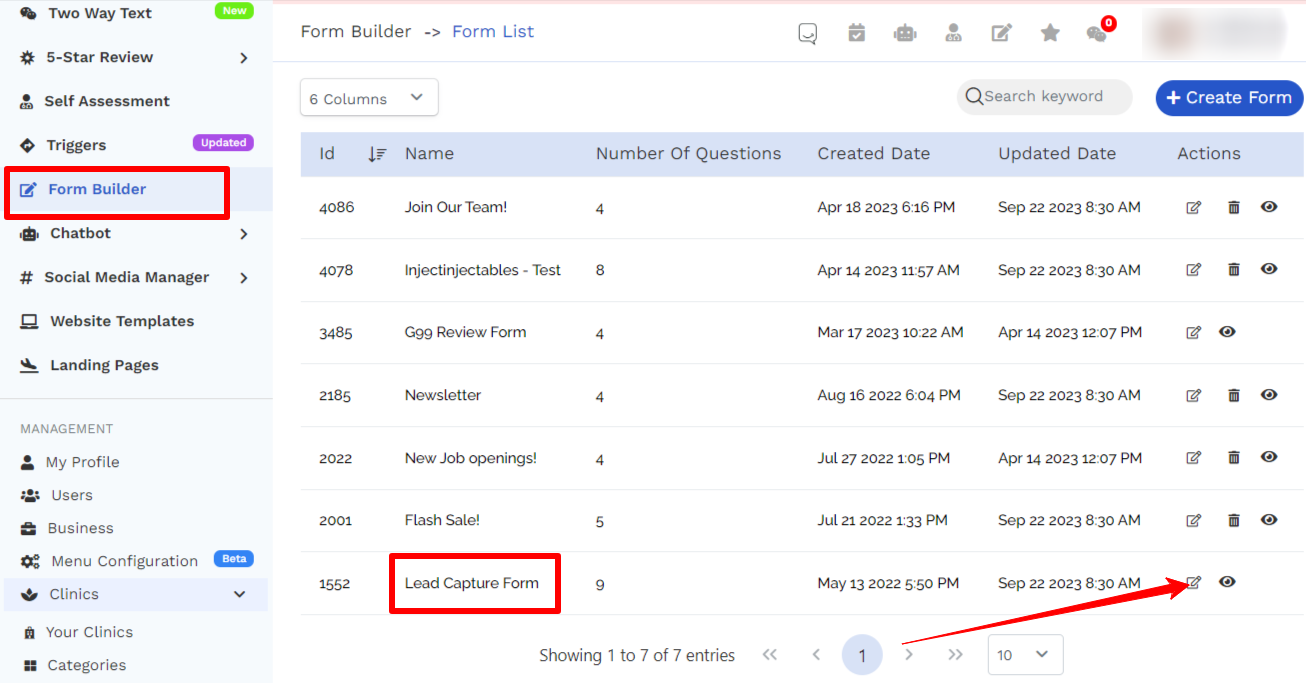
In the final and most crucial step, for the business account user/users to get notified of the lead when a patient uses the Self Assessment, we have to add a notification email address.
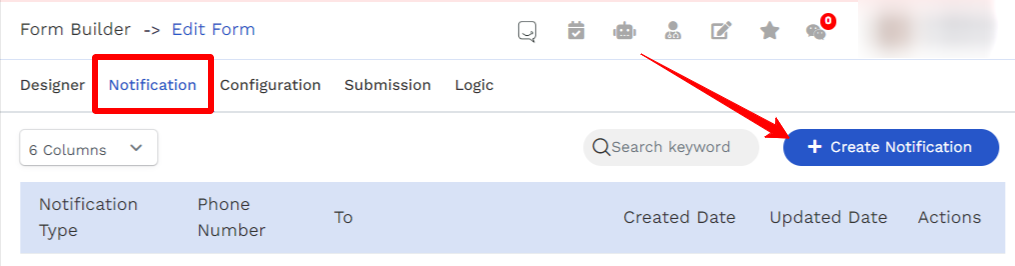
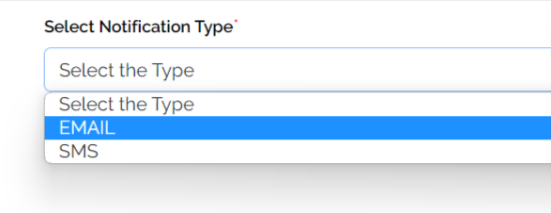
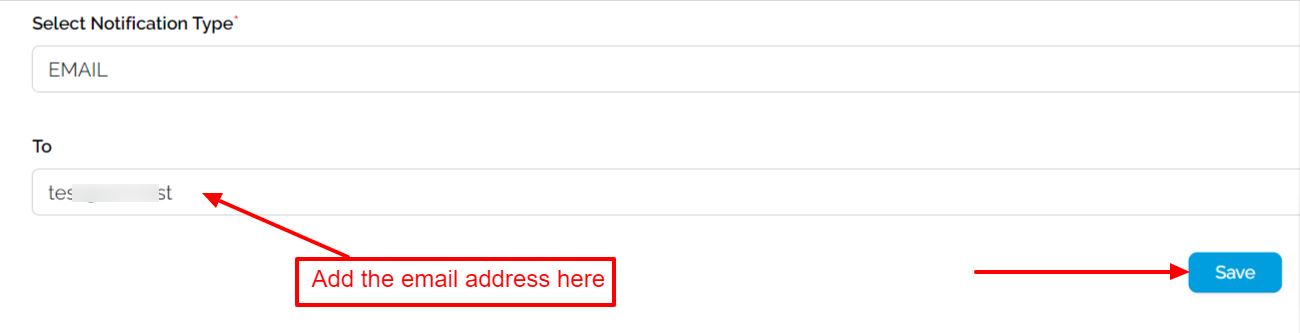
To activate this feature, go to the menu "Form Builder". Click on the edit button beside the "Lead Capture Form". Click on the "Notification" tab and select the "Create notification" option. Select the mode of notification as "email" and add the email address where you want to receive the notification.
1. 
2. 
3. 
4. 
Whenever a patient uses the Self Assessment, they will receive an email informing them of the services suited to them. The business user will receive a lead notification email on the email address provided above for receiving such notifications as well. (CLICK HERE to know more about lead notification email)
Finally, our Self Assessment is now ready to use, once the Growth99 team adds the Self Assessment to the website, the leads/visitors on the website can select the symptoms on the body areas of concern and submit the form. The screenshot of the email they receive is added below.
Note: The lead has selected the symptom wrinkles and Lines for the head, and Hair Removal for the Hands.

Related Articles
Self Assessment
Click on the Loom video link below to learn about the "Self Assessment" section in our Growth99+ app - https://www.loom.com/share/2ba3ead12ec84a908d63b5206848528f Thank YouHow To Add/Edit Symptoms For A Service?
Self Assessment is one of the signature features offered by Growth99+ for generating new leads. Self Assessment is a symptom simulator, that enables the website visitor/lead in choosing the body area and the symptoms that are applicable to them. On ...How to remove the "Virtual" appointment type from the appointment booking link?
In this article, we will learn how to remove the "Virtual" appointment type from the appointment booking link. Here are the steps! When any website visitor clicks on the booking buttons, they will be directed to the appointment booking page as the ...How To Set Up Virtual Appointment?
The appointment feature with Growth99+ is available both as an in-person appointment or as a virtual appointment. The patient can opt for either of these options when booking an appointment, in addition, the business account user can also edit an ...How To Use The Trigger Menu For A Successful Email Campaign?
The Growth99+ triggers can be used to run multiple ad campaigns for leads coming from different sources. Each trigger can be customized or a new trigger can be set up to send multiple email templates at different intervals. This helps in ensuring ...