How to set up appointment booking feature for website integration in G99+?
Growth99+ platform provides a quite user-friendly and transparent appointment booking interface.
Let's check out the entire process of how to set up the appointment booking feature using our Growth99+ app.
STEP 1
Login to your Growth99+ account. The primary step is to add the services for which you want to allow online appointments, to know more on adding the services, click here.
Below is the image guide for adding a new service.

NOTE: The service "Cost" and "Duration" are important fields when adding services for allowing appointments, in case you leave these fields empty and save the service, the application will add a default cost of $50 and duration as 30 minutes.
STEP 2
Once we have added the services, next we need to add the "providers" for all of the services. To do so, click on the "Users" menu as shown below and if the provider is already a "user" with Growth99+, follow the steps below. If the provider is not added as a user yet, then first add him/her as a user first and then make him/her a provider in the process mentioned below. Click here to know how users can be added to Growth99+.
Note: Both Provider and User are the same, but we chose to highlight the difference here because when the Growth99+ account is configured for appointments, we need to have at least one "user" in the business account who is also the "provider" of the services added.
Here we are adding an existing user as the provider of the services. In the below image, "Kitti" is already having user access to the application, but we need to her as the provider of some or all of the services she provides, this will help the chatbot user find her name and book an appointment with her based on her availability.
As seen below, Kitti's basic information was already present as she is an existing user, but to allow her to take appointments, we "select" or "Mark" her as the provider as shown below.
Upon marking her as a provider, new fields emerge, here we need to add the services she offers.
Note: we recommend that you select "ALL Categories", doing so will display all the services added to the Growth99+ account in the drop-down showing the services. From here, either select all services or select only the ones the provider offers.
STEP 3
Once the services are selected, next click on the working schedule tab to set up the provider's working schedule.
In the same way, multiple users/providers can be added to a clinic.
STEP 4
To understand the multiple ways in which appointments can be booked, we divide them into "Public Links" and "Internal Links" or also the front desk option through Calendar.
Public Links
Public Links are called so because these URLs are available to be used on any other space for allowing the patients to book an appointment, such as the website, social media platforms, or even in your email signature. Clicking on a public link opens the appointment booking page and displays information on the availability of various services, their cost, and duration. The link also helps patients know the schedule of their service provider, to help them decide the timing for their appointment.
1. Clinic Link
The "Clinic" menu under the "Account & settings" has a link that is activated when the account user submits all the mandatory data for the clinic. Check the below image for the inactive link for a new business. Check the information at the bottom of the image that appears in red font.
The below image displays all data fields as the way they appear when valid information is entered.
All the required fields should be filled up with accurate data and selecting the correct "Timezone" is a must.
To activate the clinic link, click on the blue "Save" button after entering all the data. Now you will need to reopen the clinic page.
Now the online booking link will appear as below.
The above appointment booking link can be embedded/integrated with the "Book Now" or "Book An Appointment" button on your website. When any website visitor clicks on the booking buttons, they will be directed to the appointment booking page as the below image shows.
You can also click on the quick link present in the app header section for accessing the booking page as shown below.
2. User Profile Link
The account users for every Growth99+ business account who are marked as a "Provider" will have an active link on their profile page. This link can be used as a signature in the emails for booking appointments for that particular user who is also a provider. The link can be added in the "About" section/page of the website along with the bio of the provider and a "Book An Appointment" button.
The below image shows how the link for a provider will appear on the profile page, click on the title "Provider URL" to get navigated to the URL.
Once the user profile is configured click on the "Provider URL" to check the appointment booking page.
Note: The difference between these two links is that the clinic page link will show all the services and providers available in the clinic. The patient can select any service/s or provider to book an appointment. While the user profile link will only allow appointments with that particular provider as well as display only those services that this provider is available for.
STEP 5
After choosing the date and time of the appointment from the above-shown page, you will be redirected to the page where you need to add your email, first name, last name, phone number, etc.
In the available two types of appointments, "In Person" and "Virtual", you can remove the "Virtual" type of appointment if you don't want to show it in your booking link.
For that, go to the "Clinics" page and click on the edit button beside your clinic as shown below.
On the clinic details page, go to the "Clinic Configuration" tab and check the checkbox "
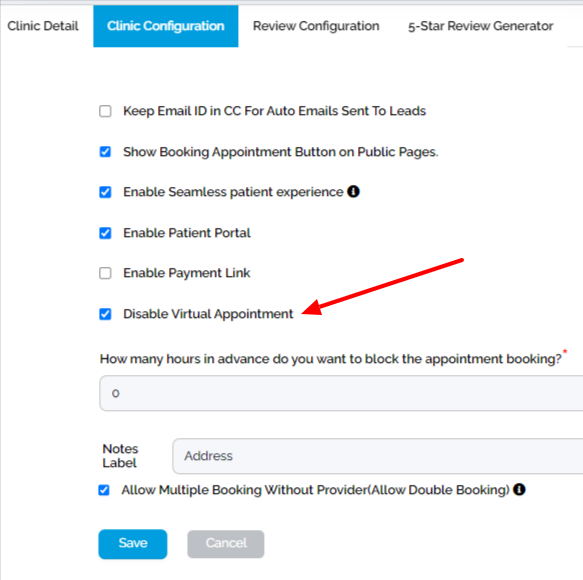

When a patient books an appointment, a patient portal registration link is being sent where he/she can login and check their appointment status, assign consent and submit questionnaires and follow up and so on.

Now, open the booking link to review, the "Virtual" booking option will not be there anymore.
In the "Clinic Configuration" tab, this patient portal is enabled by default. If you want to disable the patient portal access for your patients, you can uncheck it.
Internal Link
The internal link or the front desk option for booking an appointment is via the calendar. (CLICK HERE to know how the appointment calendar works)

Note: For more information, email us at product@growth99.com
Related Articles
How To Set Up Virtual Appointment?
The appointment feature with Growth99+ is available both as an in-person appointment or as a virtual appointment. The patient can opt for either of these options when booking an appointment, in addition, the business account user can also edit an ...How to remove the "Virtual" appointment type from the appointment booking link?
In this article, we will learn how to remove the "Virtual" appointment type from the appointment booking link. Here are the steps! When any website visitor clicks on the booking buttons, they will be directed to the appointment booking page as the ...How To Book An Appointment From Chatbot?
Having a Chatbot/AI Bot on the website can be a source of frictionless CRM. It helps forge a better relationship by guiding the website visitors with their queries, capturing the lead details, and pointing them towards the action you require from ...Adding a Third-Party Appointment Booking Link In G99+ (Video)
Click below to learn how to add a third-party appointment booking link in our G99+ app. https://www.loom.com/share/fefebd9ab496446ca3c60ba3a42c7657 Thank You!Adding A Third-Party Appointment Booking Link In G99+
If you are using our G99+ chatbot but not using our G99+ appointment booking system, instead, using a third-party booking system, then this article is for you. Here we will discuss how we can add a third-party appointment booking link to our G99+ ...